Instructor: Steve Wetzel
Compression
Most audio mixes can use a little compression to add a bit of...strength to it.
Audio compression evens out the various audio levels in the mix,
or it bumps up the sounds with low volume and attenuates louder sounds,
and, in addition, boosts the overall volume of the mix. Too much compression
will both destroy the dynamics of the mix (the difference between soft and loud)
and exaggerate its room tone. You simply work with the compressor until you
augment the mix without giving too much play to the room tone.
Be sure to monitor the audio AFTER compression has been added. This means
that you need to listen (listen and WATCH the audio meter), AFTER compression
has been added, to the entire edit and make sure no peaks occur. Peaks occur in the
damnedest places.
Here is a link to an explanation of the various compression controls from the
Audacity site.
We'll talk about a few of these in class, but for starters you can apply the factory
default settings to a track and make adjustments by ear (the compression preview
tab allows you to...preview your compression settings). The threshold sets the
decibel level at which compression BEGINS, so if your threshold is -17db, then
no sounds below -17db will be compressed, only those above -17db. So, logically,
if the threshold is low (-100 db is lower than -17db) then more sounds will be
compressed, which isn't necessarily a good thing.
One of the most important variables to consider when first making your vocal
recording is the distance of your mic TO the speaker's mouth. A fantastic mic
placed too far from the sound source will not sound so fantastic, in fact it will
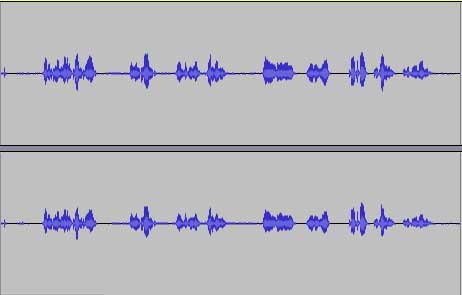
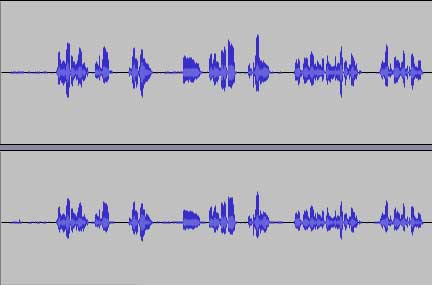
sound downright terrible. Below are two vocal recordings: the mic for voc 1
is about 14 or so inches from the mouth, voc 2 is six or so inches. The difference,
and they're both passable vocal recordings, is that voc 2 sounds much clearer and
present; voc 1 includes much more background, thus muddying the recording and
diminishing the presence of the voice a bit.
 voc 1 (farther)
Click on waveform pic to hear. Notice that the closer mic placement
yields a larger waveform. That's good. That's what you want.
 voc 2 (closer)
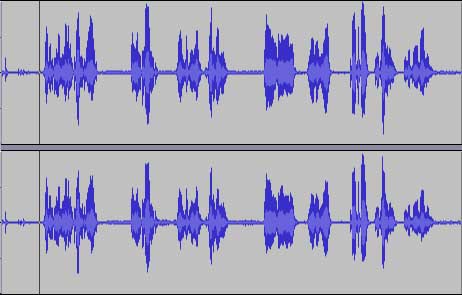
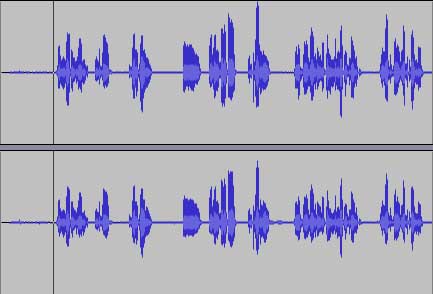
After applying compression -- Effect > Compressor -- they look and sound like this:
 voc 1 (farther)
Click on waveform pic to hear. Both now appear to have strong
waveforms, or large waveforms, but the closer mic is simply
a clearer vocal recording. But keep in mind that closer isn't always
better; sometimes a mic can be too close, especially so when the
gain control of your recorder isn't monitored properly.
 voc 2 (closer)
Monitor for peaks! In voc 2, for instance, I can see that there's a bit of audio that's
borderline peak material. I would either adjust the overall track level (read below)
or use the envelope tool to adjust the volume ONLY where the peak is likely to
occur.
Notice how much noisier voc 1 becomes. It's stronger, yes, but it's also NOISIER. Voc 2
is stronger and less taxing on the ears. In both cases, after applying compression, I would
reset the overall track volume level. It's best for your level to hop around -12 db to -6 db (pic 1). If
you're consistently at -6 db, or near -6 db, then lower the overall level: View > Mixer Board (pic 2).
 pic 1
pic 1The red line indicates be-
tween -12db and 16db. If
you're always above -6db,
then it's likely your recording
is too HOT. Turn it DOWN.
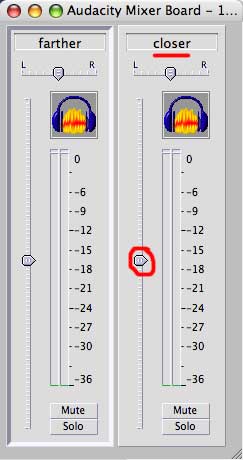 pic 2
pic 2Slide the slider up and down to adjust track
level. Remember that you can name each
track by simply clicking on the current track
name in the timelinem, then select Name and
retitle. It's important to name your tracks so that
you don't lose track of your tracks.
Lower the track slider 1 db at a time until you achieve a satisfactory level and sound.
You can also use the "show clipping" tool: View > Show Clipping ("clippng" is "peaking",
pic 3).
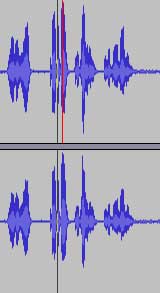 pic 3
pic 3The vertical red line in the top
track is indicating a peak. You
can use your eye to find peaks,
but this tool speeds up the process
a bit. Lower the overall track to
reduce peak, or use the envelope
tool to adjust peaks one at a time.
Use compression wisely, or...use it with caution. Don't just slap it on a track. You need to
experiment with it and find a setting that works given your recording, which means you have
to try several different adjustments to the various compressor controls, and you'll need to
readjust the overall track volume once compression is applied.